We've moved!

You will be automatically redirected to our new home in 5 seconds. If that does not occur,or you don't want to wait, visit
WordsOnWendhurst.com
Don't forget to update your bookmarks!

Showing posts with label living room. Show all posts

Tuesday, January 5, 2010

Calm and Serene Living Room, and Kid Friendly Too!
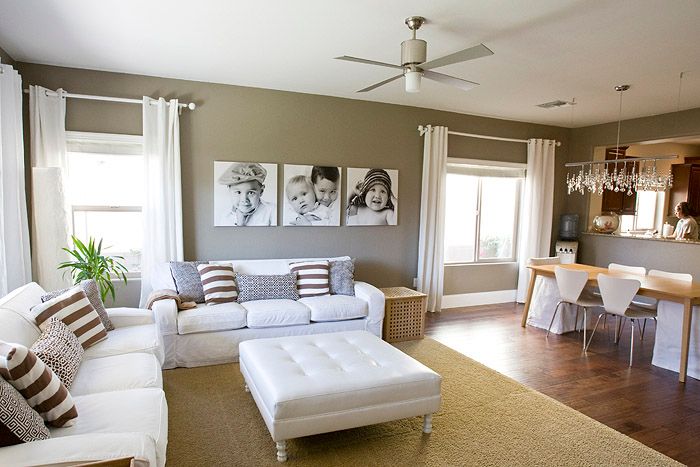
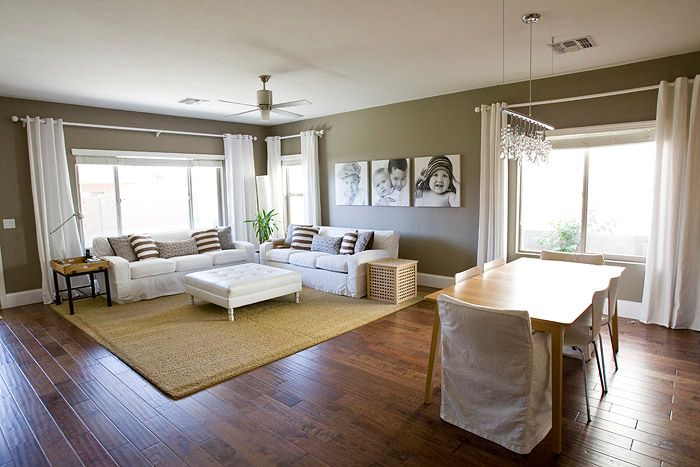

Something about winter and the New Year always has me editing the decorative items in my home and reducing them to the bare minimum. With that frame of mind, it's no wonder that this simple, no fuss room is speaking to me this week. I found these pictures on Jen's great blog Inspiration for Decoration. She has thousands of images uploaded, and I could seriously spend days looking at all of the great pictures. ETA: This room belongs to the talented Michelle at Three Men and a Lady. Thanks, Emily!

Things I like about this room:
  • The affordability: the floors look to be laminate. The couches and chairs are slipcovered, meaning you could purchase whatever was in your budget and then cover them all to coordinate them. The pillows are all simple, and easily made by you if you can sew straight seams.
  • The color palette: a very restricted color palette of greenish khaki, soft tans, creamy whites and black and white photos means this room is relaxing and serene.
  • The kid-friendly factor: Slipcovered furniture means washable furniture. The dining room table is simple and durable, the curtains can be bleached clean. The rug can take quite a beating before it will show wear, and the ottoman in place of a coffee table means that there are no sharp corners to bang little heads on.
  • The wow factor: As calm and kid-friendly as this room is, it still has a glamorous chandelier, a funky fan/light, pretty moulding and interesting dining room chairs. It's a great example of making a room stylish, and still making it friendly for those who live in it.
  • The personal touch: As a photographer (mostly of children) I love those gorgeous portraits on the wall. Showcasing them in black and white makes them more like art, while still keeping it very personal.
What about you? Does winter have you furiously editing your things and restricting your color palette? Or is that just me...

Calm and Serene Living Room, and Kid Friendly Too!


Something about winter and the New Year always has me editing the decorative items in my home and reducing them to the bare minimum. With that frame of mind, it's no wonder that this simple, no fuss room is speaking to me this week. I found these pictures on Jen's great blog Inspiration for Decoration. She has thousands of images uploaded, and I could seriously spend days looking at all of the great pictures. ETA: This room belongs to the talented Michelle at Three Men and a Lady. Thanks, Emily!

Things I like about this room:


  • The affordability: the floors look to be laminate. The couches and chairs are slipcovered, meaning you could purchase whatever was in your budget and then cover them all to coordinate them. The pillows are all simple, and easily made by you if you can sew straight seams.

  • The color palette: a very restricted color palette of greenish khaki, soft tans, creamy whites and black and white photos means this room is relaxing and serene.

  • The kid-friendly factor: Slipcovered furniture means washable furniture. The dining room table is simple and durable, the curtains can be bleached clean. The rug can take quite a beating before it will show wear, and the ottoman in place of a coffee table means that there are no sharp corners to bang little heads on.

  • The wow factor: As calm and kid-friendly as this room is, it still has a glamorous chandelier, a funky fan/light, pretty moulding and interesting dining room chairs. It's a great example of making a room stylish, and still making it friendly for those who live in it.

  • The personal touch: As a photographer (mostly of children) I love those gorgeous portraits on the wall. Showcasing them in black and white makes them more like art, while still keeping it very personal.


What about you? Does winter have you furiously editing your things and restricting your color palette? Or is that just me...

Wednesday, March 25, 2009

Loving the Living Room

I'm really trying to get every room in the house photographed before the end of the month so I can have an updated album of how the house has changed since we bought it last February. I can't believe it's been a year already! The Castle is feeling more and more like home, and a pleasant one at that!
Here are some pics of the living room in its mostly finished state. But, before I show off all of our hard work, here's a reminder of where we started.


And now, the stunning afters :-)


Here's what we've accomplished in this room:
  • Tore out icky brown carpeting
  • Scraped glued on cork (!) panels off the walls
  • Spackled, patched, sanded and primed walls
  • Painted walls
  • Tore out weird light thing in fireplace area
  • Found gas logs in attic, placed in fireplace
  • Tore out terrible header over mantel, documented here
  • Installed new lights, wiring, primed and painted mantel area
  • Replaced hardware on bookcase doors
  • Installed moulding around window.
  • Replaced all outlets in room
  • Hung pictures, shades and curtains.
Still to do:
  • Install moulding around other window
  • Install moudling on mantel
  • Hook up logs if possible
  • Replace tiling in front of fireplace
  • Refinish floor, install quarter round next to baseboards
  • Make new grates for floor vents
All in all, I'd say we've made pretty good progress in this room, and we spend lots of time in it so we definitely love it!

Loving the Living Room

I'm really trying to get every room in the house photographed before the end of the month so I can have an updated album of how the house has changed since we bought it last February. I can't believe it's been a year already! The Castle is feeling more and more like home, and a pleasant one at that!

Here are some pics of the living room in its mostly finished state. But, before I show off all of our hard work, here's a reminder of where we started.


And now, the stunning afters :-)


Here's what we've accomplished in this room:


  • Tore out icky brown carpeting

  • Scraped glued on cork (!) panels off the walls

  • Spackled, patched, sanded and primed walls

  • Painted walls

  • Tore out weird light thing in fireplace area

  • Found gas logs in attic, placed in fireplace

  • Tore out terrible header over mantel, documented here

  • Installed new lights, wiring, primed and painted mantel area

  • Replaced hardware on bookcase doors

  • Installed moulding around window.

  • Replaced all outlets in room

  • Hung pictures, shades and curtains.


Still to do:


  • Install moulding around other window

  • Install moudling on mantel

  • Hook up logs if possible

  • Replace tiling in front of fireplace

  • Refinish floor, install quarter round next to baseboards

  • Make new grates for floor vents


All in all, I'd say we've made pretty good progress in this room, and we spend lots of time in it so we definitely love it!


Wednesday, February 4, 2009

Mantel Makeover


This has got to be one of my favorite makeovers so far in our house. It really improved the look of the living room, and allowed the mantel to become the star of the room!


We started by tearing out the paneling above the built-in bookcases and the fireplace. Behind that paneling was plywood, and beneath that plywood was avocado green wallpaper. Under the wallpaper was the original plaster, but unfortunately we could only fix up the plaster on the side walls. The plaster on the front wall was too far gone. We also removed the "header" that housed the three fluorescent light fixtures, and all of the old wiring that ran to those lights. Ugh. 

Then, we ran new wiring, installed the two ceiling fixtures on the sides and a halogen spot in the middle, and put up drywall to cover the sad, sad ceiling and back wall. After a few hours (days) of spackling and sanding, we were ready to prime and paint. 

Here is the ghastly before:

And the much improved after:


Of course, there is still a bit of decorative moulding to install, and a couple of other minor things, but overall I'd say the mantel is now stellar!

Mantel Makeover


This has got to be one of my favorite makeovers so far in our house. It really improved the look of the living room, and allowed the mantel to become the star of the room!

We started by tearing out the paneling above the built-in bookcases and the fireplace. Behind that paneling was plywood, and beneath that plywood was avocado green wallpaper. Under the wallpaper was the original plaster, but unfortunately we could only fix up the plaster on the side walls. The plaster on the front wall was too far gone. We also removed the "header" that housed the three fluorescent light fixtures, and all of the old wiring that ran to those lights. Ugh.

Then, we ran new wiring, installed the two ceiling fixtures on the sides and a halogen spot in the middle, and put up drywall to cover the sad, sad ceiling and back wall. After a few hours (days) of spackling and sanding, we were ready to prime and paint.

Here is the ghastly before:


And the much improved after:


Of course, there is still a bit of decorative moulding to install, and a couple of other minor things, but overall I'd say the mantel is now stellar!

Related Posts with Thumbnails

Blog Top Sites

Home & Garden Blogs
>

  © Blogger template 'Morning Drink' by Ourblogtemplates.com 2008

Back to TOP  

GoStats hit counter