We've moved!

You will be automatically redirected to our new home in 5 seconds. If that does not occur,or you don't want to wait, visit
WordsOnWendhurst.com
Don't forget to update your bookmarks!

Showing posts with label DIY. Show all posts

Monday, March 1, 2010

Make the Change!

You know how it's those little things that you change in your home that make all the difference? I recently made one of those in our living room, and I am so glad I did. And the worst part is, I thought about it for for-ev-er and it only took me about five minutes to take care of. I can guarantee you that I spent more than five minutes thinking about making this change, and trying to decide if it would look any better.

Lover's mom gave us this poster when we bought the castle, and we found a cool poster sized frame on clearance at The Christmas Tree Shop shortly thereafter. It was about $4 because the plexiglass was popped out at a weird angle. That's right, nothing actually the matter with the frame, it just looked wonky. The colors in the poster went perfectly with the color scheme that we were working with in the living room, so we were psyched. :-)  We hung it up on the wall, and shortly thereafter found the perfect narrow table (on the side of the road) to go beneath it. From the moment we hung it, I thought, you know that might be too high. And then I left it. And stressed about it. Until the other day, when I finally decided to tackle it. I ended up lowering it about 7 inches.

Here's the before:


And the after:


Can't see a difference? :-) I know, it's not that drastic. Here they are side by side.


I love it. Now I can sit on the couch and not stress about that picture. I can just enjoy it. So the moral of the story is to stop stressing, and just DO whatever it is you are thinking about. The extra space in your brain will thank you. :-)

Linked to DIY Day @ A Soft Place to Land

Before and After Party @ Thrifty Decor Chick

Sunday, February 21, 2010

Living Room Lamp Makeover

After a few months of searching, and a few more months of trial and error, I have a pair of lamps that I am absolutely crazy about. They're sitting pretty on either side of the couch in my living room - and they are definitely an upgrade from the previous lamps.

Here's the Before:

And the After:
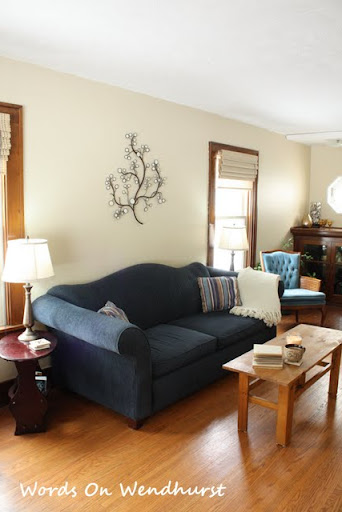


But it wasn't as simple as just swapping out one lamp for another. Oh how I wish it had been! I love doing things myself and adding my own personal touch to things, but sometimes I get myself in over my head.

We bought the little iron lamps from Walmart when we first got married. They were $13 a set, and our living room had no lamps, and we were broke, so that is what we got. I really liked the iron scrollys, and really didn't like the shades. (Faux leather anyone?) They were fine in our little apartment, where everything was perfectly mismatched, but once we moved into the castle, I was ready for something new. I took my time though, waiting to find a pair of lamps that I really liked, within my price range.

Last November I found a pair of lamps at the bargain outlet for $20. I loved the shape of them, and the price. I wasn't sure about the finish on them, but I knew I could change it if I wanted. Then, in December, right before Christmas, I found a set of matching, almost drum shaped shades at the Salvation Army store. Only problem?  They were fire engine red! Nice, but they wouldn't exactly go with my decor. :-) But I figured for 6.99 a piece I could recover them and still come out ahead. (Famous last words.)
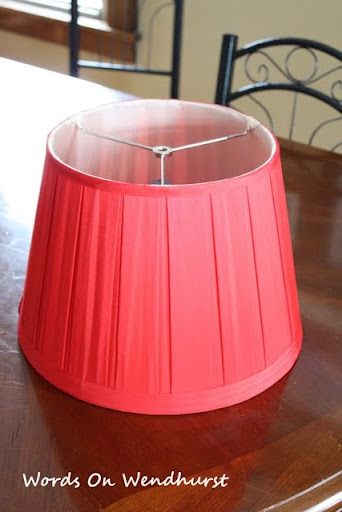


The first thing I did was strip them down to the metal frame.
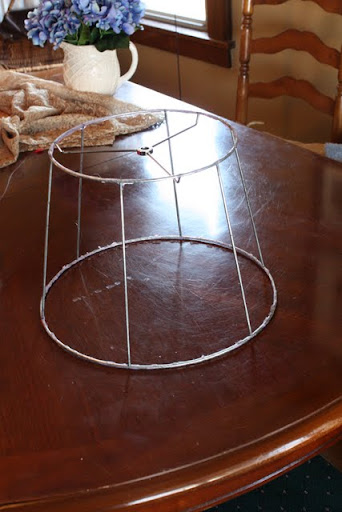


I took careful notes on how the shade and lining had been constructed, as well as the little details like the border binding and the little bits of fabric that covered the poles. Then I went to JoAnns' and asked them to help me find the closest match to the fabric that was already on the shade, which seemed to be some sort of taffeta. The closest they had was an ivory taffeta that wasn't exactly the same weight, but I figured it would work.  I made all the necessary measurements, and then spent a day making the first shade. I sewed and glued and cut and glued and burned my finger.
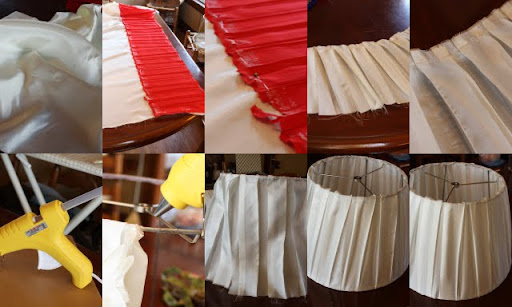
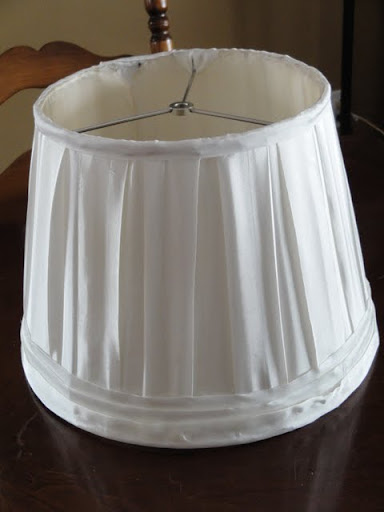


And it looked horrible. Actually, it looked ok, until you turned the light on. Then you could see all the places I had messed up, and the taffeta wasn't a thick enough weight, so there were shadows in all the wrong places (where I had messed up). Plus, in an attempt to be thrifty, I had reused the lining from the original shade, and it looked terrible. For one thing, there was a big tear in one side!


I lived with it for a few days to see if I was just being too much of a perfectionist. Well, apparently I am too much of a perfectionist, because I hated it. So, I was back to square one. I spent some more time thinking about it, and working up the nerve to try again. Then I went back to JoAnns in search of something that would work better for these particular shades. This time I selected a linen fabric that was a creamy oatmeal color, that I instantly loved. And I spent $18 on it, which brought my total for each shade to over $20. Oh well. I was all in at this point. I also purchased a hem gauge, to aid me in creating an even binding for the edge of the shade.

This time each shade took me only two hours to complete, start to finish. I simply traced the frame onto the fabric, allowing for some extra to wrap around as a hem. I used the leftover taffeta from the first purchase as a lining, and skipped the pleats all together. The fabric has so much texture that it didn't need a complicated pattern. A simple border at the top and bottom covered the uglies of the shade, and looked fabulous. I didn't burn myself. I loved the fabric. The world was back as it should be. :-)


I also ended up painting the lamp bases. They were a shiny gold color, with some black in them. I painted the bases with a metallic craft paint called Rich Espresso. Which actually looks like a really deep bronze. Then I took a matte black spray paint and sprayed it very very lightly over the bronze, to darken the color up just a bit more. They came out perfect. The original finish is on the left, my madeover version is on the right. (Pre black spray paint)
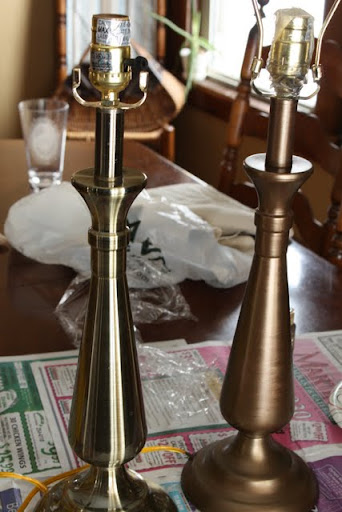


And the funny thing was, once I finished everything an put them all together, along with the finials I had purchased at the same time as the shades, the new color matched the finish on the finials perfectly. I'm guessing there was some subconscious thought processes goin on there.
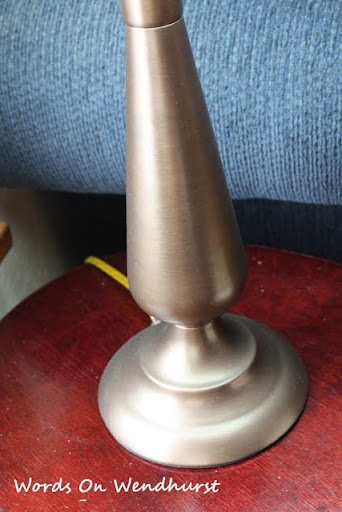


So, in the end, my total came to about $30 per lamp, after the initial purchase of the lamp and shades, the first fabric purchase, the second purchase, and the miscellaneous supplies. I 'm not sure I would have snatched a pair of lamps off the shelf for that price, but the end result is something I absolutely LOVE, I made entirely by myself, and they are so classic looking that I won't tire of them easily. So if I had known all of that in the store, I probably would have paid that.

What do YOU think? Was it worth all of the hard work and heartache?


Linked to Metamorphosis Monday @ Between Naps on The Porch


Make Your Monday @ Twice Remembered


Make it for Monday @ Cottage Instincts


DIY Day @ A Soft Place to Land


Get Your Craft On @ Today's Creative Blog


Thrifty Thursday @ Tales from Bloggeritaville


Transformation Thursdays @ The Shabby Chic Cottage


Strut Your Stuff Thursday @ Somewhat Simple


Before and After Party @ Thrifty Decor Chick


I Made it Without My Hubby @ Shanty 2 Chic


Sunday, January 10, 2010

Cheap and Easy Wall Art


I gave this wall in our dining room a makeover back in September. I showed you all about it and talked about how proud I was that I did the whole thing myself. I knew I wanted to do something simple to dress this wall up, but I didn't want to spend a lot of money or time on it, because, frankly, I don't have a lot of either to spare. :-) Actually, the real reason is that the majority of this wall will be removed when we remodel the kitchen in a few years, so I didn't want to invest in something that I wouldn't need in a couple of years.

A few days ago I came up with the idea of putting a quote onto this wall. It's cheap, fast and easy, and easily removable when the time comes to tear out this wall. There is an enormous variety of cute quotes out there, and I was faced with the insurmountable task of choosing one to place on our wall. Decisions like this are really hard for me. Which quote do I want? Will I like this quote a minute after it's been up? What sentiment do I want to express with this quote? I hemmed and hawed over it for about a week, and then decided I was overthinking it. I'd simply wait till I came across a quote that jumped out at me, and then I would use that one. The very next day, I went to and antique and crafts store, and saw the perfect quote. Here's what my wall looks like now.

I love the sentiment that this quote expresses. This castle is filled with love, and even though I like things to look nice and pretty, my most important goal for this house is that it be a home to those who live here. (and those who come to visit!)

In the end I decided not to use a vinyl quote, simply because I had the materials on hand to paint it on the wall myself, and that would be much more frugal! I used a yardstick and a level to draw straight guidelines on the wall, and played around with different fonts on my computer until I found some combinations that I liked. Then, using a piece of chalk, I traced out the basic design of each letter onto the wall, taking my time and erasing parts I didn't like. Once the outline was complete I went over the design with my Painter's pen (left over from this project). I found that if I drew right next to the chalk line the painter's pen didn't get too mucked up with chalk, and I just kept a wet paper towel on hand to wipe off the tip as I went. I let the paint dry for about twenty minutes, then went back and wiped off the rest of the chalk with the wet paper towel. The water evaporated in about a minute, and then I set about filling in each letter until it looked the way I wanted it too.

I worked on this project off and on for two hours total, I would say. I love how it came out, and the fact that I spent almost nothing (just the chalk!) for this little part of my dining room.


Linked to Metamorphosis Monday @ Between Naps on the Porch

Made it for Monday @ Cottage Instincts

DIY Day @ A Soft Place to Land

Cheap and Easy Wall Art


I gave this wall in our dining room a makeover back in September. I showed you all about it and talked about how proud I was that I did the whole thing myself. I knew I wanted to do something simple to dress this wall up, but I didn't want to spend a lot of money or time on it, because, frankly, I don't have a lot of either to spare. :-) Actually, the real reason is that the majority of this wall will be removed when we remodel the kitchen in a few years, so I didn't want to invest in something that I wouldn't need in a couple of years.

A few days ago I came up with the idea of putting a quote onto this wall. It's cheap, fast and easy, and easily removable when the time comes to tear out this wall. There is an enormous variety of cute quotes out there, and I was faced with the insurmountable task of choosing one to place on our wall. Decisions like this are really hard for me. Which quote do I want? Will I like this quote a minute after it's been up? What sentiment do I want to express with this quote? I hemmed and hawed over it for about a week, and then decided I was overthinking it. I'd simply wait till I came across a quote that jumped out at me, and then I would use that one. The very next day, I went to and antique and crafts store, and saw the perfect quote. Here's what my wall looks like now.


I love the sentiment that this quote expresses. This castle is filled with love, and even though I like things to look nice and pretty, my most important goal for this house is that it be a home to those who live here. (and those who come to visit!)

In the end I decided not to use a vinyl quote, simply because I had the materials on hand to paint it on the wall myself, and that would be much more frugal! I used a yardstick and a level to draw straight guidelines on the wall, and played around with different fonts on my computer until I found some combinations that I liked. Then, using a piece of chalk, I traced out the basic design of each letter onto the wall, taking my time and erasing parts I didn't like. Once the outline was complete I went over the design with my Painter's pen (left over from this project). I found that if I drew right next to the chalk line the painter's pen didn't get too mucked up with chalk, and I just kept a wet paper towel on hand to wipe off the tip as I went. I let the paint dry for about twenty minutes, then went back and wiped off the rest of the chalk with the wet paper towel. The water evaporated in about a minute, and then I set about filling in each letter until it looked the way I wanted it too.

I worked on this project off and on for two hours total, I would say. I love how it came out, and the fact that I spent almost nothing (just the chalk!) for this little part of my dining room.


Linked to Metamorphosis Monday @ Between Naps on the Porch

Made it for Monday @ Cottage Instincts

DIY Day @ A Soft Place to Land


Monday, December 14, 2009

Dare to DIY: Simple Christmas Card Display

It's week five of Dare to DIY over at Newlywoodwards. This week's challenge was to make something new to deck your halls.

For the past several years I have taped the Christmas cards that we receive up on the wall in our dining room. It looked cute, but also kind of cluttery, and by Christmas I was always ready to yank them all down and throw them away. So I started looking for something I could use in a new way to display the Christmas cards.

In our living room we have a little sliver of wall next to the window that I never know how to decorate. I've yet to find the right piece of art, or whatnot to put there. Usually it just stays empty. So I thought it would be the perfect place for a fun Christmas card display.

I had an old cork board up in the office that I thought would work for this project. I'm trying to wait to buy Christmas decorations until after the holidays this year (not that I'm crazy about the selection this year anyways) once everything goes on sale, so I knew I would be making this myself.

While in Joann Fabrics for the umpteenth time this month, I saw a wrapping paper display that was 60% off. I found this pretty white paper with gold designs on it and knew that it would work for this project.
I wrapped the board as if I were wrapping a present, using regular Scotch tape to adhere it to the back of the board.

Then I raided my ribbon stash for a gold ribbon, and attached it to the back of the frame with little thumbtacks.

Two seconds later it was hanging from the nail in the wall,

and displaying the cards we had received so far.


Simple, cheap and chic. I love it, and the best part is I can change it up each year to accommodate the color scheme I'm using then. What have you made for Christmas?

Linked to Metamorphosis Monday @ Between Naps on the Porch

Make it for Monday @ Cottage Instincts

It's So Very Creative @ It's So Very Cheri

DIY Holiday Highlights @ The DIY Showoff

DIY Day @ A Soft Place to Land

Dare to DIY: Simple Christmas Card Display

It's week five of Dare to DIY over at Newlywoodwards. This week's challenge was to make something new to deck your halls.


For the past several years I have taped the Christmas cards that we receive up on the wall in our dining room. It looked cute, but also kind of cluttery, and by Christmas I was always ready to yank them all down and throw them away. So I started looking for something I could use in a new way to display the Christmas cards.

In our living room we have a little sliver of wall next to the window that I never know how to decorate. I've yet to find the right piece of art, or whatnot to put there. Usually it just stays empty. So I thought it would be the perfect place for a fun Christmas card display.

I had an old cork board up in the office that I thought would work for this project. I'm trying to wait to buy Christmas decorations until after the holidays this year (not that I'm crazy about the selection this year anyways) once everything goes on sale, so I knew I would be making this myself.


While in Joann Fabrics for the umpteenth time this month, I saw a wrapping paper display that was 60% off. I found this pretty white paper with gold designs on it and knew that it would work for this project.

I wrapped the board as if I were wrapping a present, using regular Scotch tape to adhere it to the back of the board.


Then I raided my ribbon stash for a gold ribbon, and attached it to the back of the frame with little thumbtacks.


Two seconds later it was hanging from the nail in the wall,


and displaying the cards we had received so far.


Simple, cheap and chic. I love it, and the best part is I can change it up each year to accommodate the color scheme I'm using then. What have you made for Christmas?

Linked to Metamorphosis Monday @ Between Naps on the Porch

Make it for Monday @ Cottage Instincts

It's So Very Creative @ It's So Very Cheri

DIY Holiday Highlights @ The DIY Showoff

DIY Day @ A Soft Place to Land


Monday, December 7, 2009

DIY Monogram Coasters from Tiles

It's Week 4 of the Dare to DIY party over at Newlywoodwards. This week our challenge was to create a homemade gift.


We usually try to give handmade gifts whenever we have ideas for making something ourselves. All of Lover's siblings are grown and married, and my brothers are quickly reaching the point where they're able to simply buy whatever they want for themselves. It makes Christmas shopping a little difficult, so we try to give handmade things that will at least have some sentimental value. Of course, we make sure that they're something useful, so we're not cluttering up their home with junk like I mentioned in this post.

Last Christmas I bookmarked this idea of DIY coasters from tiles. The original idea I found actually decoupaged photos to tiles for displaying them in your home. I've also seen many variations of using the tiles as coasters, and I decided to do my own take.

I liked the idea of painting a simple monogram onto the tile and then adding some felt feet to make them coasters.

I found boxes of 4"x4" travertine tiles at Lowe's. They're a really light neutral tan color, which I thought would be pretty in everybody's home. The boxes were about $5 for 9 tiles, so the projects was shaping up to be very inexpensive.

I wiped each tile off with a damp cloth to remove the tile dust. Then I printed out the first letter of the siblings names onto computer paper, and cut out each letter. I traced around the letter onto the tile, using the paper as a sort of reverse stencil.

If you have really steady hands you could handpaint the letter in. I don't, and I wanted to keep things simple, so I used a paint pen in a deep brown to color in the letters. I've always enjoyed coloring, so this part was really fun. :-)

When the paint was completely dry, I took all the tiles down to the basement. I flipped them all onto their backs and sprayed them with a light coat of acrylic sealer (also from Lowes) I let that dry for about half an hour, then flipped them back over and sprayed the fronts. The sealer makes the tile waterproof, protects the painted monogram, and keeps the tile from getting its dust all over everything.

I let them air out down in the basement for about two days, until they didn't stink like sealer anymore. :0) The last step was to take miniature felt circles and stick one to each corner. This protects each tile from the other, and also your fab table!


Pretty packaging is just as important as the gift itself. I tied each set of four coasters together with a pretty ribbon, and placed each set into tins that I found that were the perfect size. The total cost of the project was about$15 for four sets of coasters and about two hours total. Not bad!

Be sure to check out all the other fabulous projects this week at Kim's!

Linked to DIY Day @ A Soft Place to Land

DIY Monogram Coasters from Tiles

It's Week 4 of the Dare to DIY party over at Newlywoodwards. This week our challenge was to create a homemade gift.


We usually try to give handmade gifts whenever we have ideas for making something ourselves. All of Lover's siblings are grown and married, and my brothers are quickly reaching the point where they're able to simply buy whatever they want for themselves. It makes Christmas shopping a little difficult, so we try to give handmade things that will at least have some sentimental value. Of course, we make sure that they're something useful, so we're not cluttering up their home with junk like I mentioned in this post.

Last Christmas I bookmarked this idea of DIY coasters from tiles. The original idea I found actually decoupaged photos to tiles for displaying them in your home. I've also seen many variations of using the tiles as coasters, and I decided to do my own take.


I liked the idea of painting a simple monogram onto the tile and then adding some felt feet to make them coasters.


I found boxes of 4"x4" travertine tiles at Lowe's. They're a really light neutral tan color, which I thought would be pretty in everybody's home. The boxes were about $5 for 9 tiles, so the projects was shaping up to be very inexpensive.


I wiped each tile off with a damp cloth to remove the tile dust. Then I printed out the first letter of the siblings names onto computer paper, and cut out each letter. I traced around the letter onto the tile, using the paper as a sort of reverse stencil.

If you have really steady hands you could handpaint the letter in. I don't, and I wanted to keep things simple, so I used a paint pen in a deep brown to color in the letters. I've always enjoyed coloring, so this part was really fun. :-)

When the paint was completely dry, I took all the tiles down to the basement. I flipped them all onto their backs and sprayed them with a light coat of acrylic sealer (also from Lowes) I let that dry for about half an hour, then flipped them back over and sprayed the fronts. The sealer makes the tile waterproof, protects the painted monogram, and keeps the tile from getting its dust all over everything.

I let them air out down in the basement for about two days, until they didn't stink like sealer anymore. :0) The last step was to take miniature felt circles and stick one to each corner. This protects each tile from the other, and also your fab table!


Pretty packaging is just as important as the gift itself. I tied each set of four coasters together with a pretty ribbon, and placed each set into tins that I found that were the perfect size. The total cost of the project was about$15 for four sets of coasters and about two hours total. Not bad!


Be sure to check out all the other fabulous projects this week at Kim's!

Linked to DIY Day @ A Soft Place to Land

Sunday, November 15, 2009

Dare to DIY: A Thanksgiving Project


I'm participating in Kim at Newlywoodward's Dare to DIY Blog Party. This week our challenge was to Dare to be Thankful! Here's my contribution to the party.

I've had a Thanksgiving tradition for the last few years where I find some time to sit down and make a list of the things in my life that I am thankful for. It's always such a refreshing time as I realize just how blessed I am, and how very much I have to be thankful for.

This year I wanted to make a little frame that we could use each Thanksgiving to list the things that we are thankful for. Jen from A Thousand Words made a menu plan a while back that she did by repurposing a picture frame, and I adapted that idea for this project.

I went to my favorite store, Goodwill, and found a great tabletop frame that would work for the project. Sadly, it was not 50% off, and it definitely needed a makeover! I actually liked the border, but the whole frame was a little too 80's. :-)

I first painted the frame with a warm brown color that I made by mixing two of my brown craft paints together.

It took two coats to cover the shiny black and gold, but once they were dry, the frame had a whole new look. I took a wet paper towel and rubbed little parts of the brown off to show the gold on the edges again, just to give the color some dimension.

I had fun painting little fall colored leaves over the frame, and I even attempted painting some letters onto the bottom to spell out Thanksgiving.

To finish it up, I just popped some pretty paper inside the frame, and cleaned the glass. Then, with a wet erase marker I could just write the things I am thankful for over the next week or so leading up to Thanksgiving. Then, when the holiday is over, I can wipe it clean and save it for next year!


I thought the frame looked a little lonely on its own, so I set it with a vase of fall colored mums and an origami turkey that I made following this set of instructions.

Hope you enjoyed my little Thanksgiving project. Be sure to check back next week to see what Kim is challenging us to DIY!

Also linked to Metamorphosis Monday @ Between Naps on the Porch

It's So Very Creative @ It's So Very Cheri

Made It Mondays @ Persimmon Perch

DIY Day @ A Soft Place to Land

Related Posts with Thumbnails

Blog Top Sites

Home & Garden Blogs
>

  © Blogger template 'Morning Drink' by Ourblogtemplates.com 2008

Back to TOP  

GoStats hit counter