
Living Room Lamp Makeover
After a few months of searching, and a few more months of trial and error, I have a pair of lamps that I am absolutely crazy about. They're sitting pretty on either side of the couch in my living room - and they are definitely an upgrade from the previous lamps.
Here's the Before:
And the After:
But it wasn't as simple as just swapping out one lamp for another. Oh how I wish it had been! I love doing things myself and adding my own personal touch to things, but sometimes I get myself in over my head.
We bought the little iron lamps from Walmart when we first got married. They were $13 a set, and our living room had no lamps, and we were broke, so that is what we got. I really liked the iron scrollys, and really didn't like the shades. (Faux leather anyone?) They were fine in our little apartment, where everything was perfectly mismatched, but once we moved into the castle, I was ready for something new. I took my time though, waiting to find a pair of lamps that I really liked, within my price range.
Last November I found a pair of lamps at the bargain outlet for $20. I loved the shape of them, and the price. I wasn't sure about the finish on them, but I knew I could change it if I wanted. Then, in December, right before Christmas, I found a set of matching, almost drum shaped shades at the Salvation Army store. Only problem? They were fire engine red! Nice, but they wouldn't exactly go with my decor. :-) But I figured for 6.99 a piece I could recover them and still come out ahead. (Famous last words.)
The first thing I did was strip them down to the metal frame.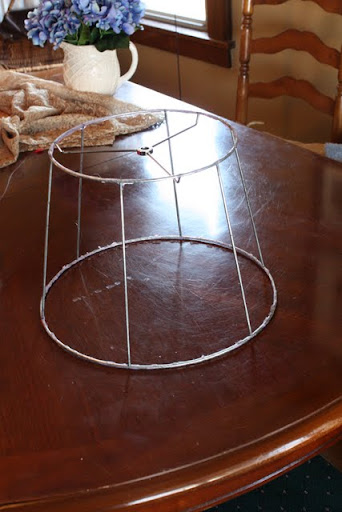
I took careful notes on how the shade and lining had been constructed, as well as the little details like the border binding and the little bits of fabric that covered the poles. Then I went to JoAnns' and asked them to help me find the closest match to the fabric that was already on the shade, which seemed to be some sort of taffeta. The closest they had was an ivory taffeta that wasn't exactly the same weight, but I figured it would work. I made all the necessary measurements, and then spent a day making the first shade. I sewed and glued and cut and glued and burned my finger.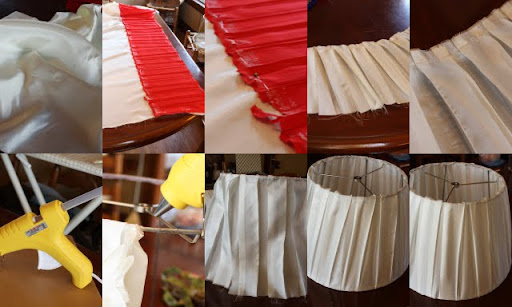
And it looked horrible. Actually, it looked ok, until you turned the light on. Then you could see all the places I had messed up, and the taffeta wasn't a thick enough weight, so there were shadows in all the wrong places (where I had messed up). Plus, in an attempt to be thrifty, I had reused the lining from the original shade, and it looked terrible. For one thing, there was a big tear in one side!
I lived with it for a few days to see if I was just being too much of a perfectionist. Well, apparently I am too much of a perfectionist, because I hated it. So, I was back to square one. I spent some more time thinking about it, and working up the nerve to try again. Then I went back to JoAnns in search of something that would work better for these particular shades. This time I selected a linen fabric that was a creamy oatmeal color, that I instantly loved. And I spent $18 on it, which brought my total for each shade to over $20. Oh well. I was all in at this point. I also purchased a hem gauge, to aid me in creating an even binding for the edge of the shade.
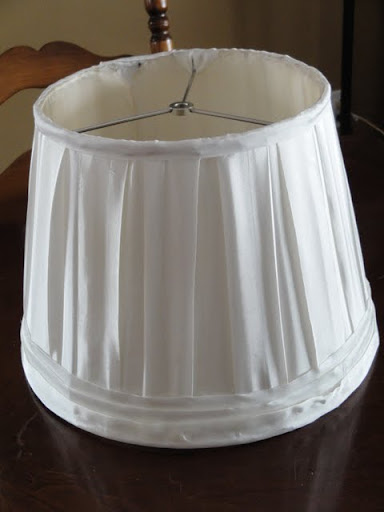
This time each shade took me only two hours to complete, start to finish. I simply traced the frame onto the fabric, allowing for some extra to wrap around as a hem. I used the leftover taffeta from the first purchase as a lining, and skipped the pleats all together. The fabric has so much texture that it didn't need a complicated pattern. A simple border at the top and bottom covered the uglies of the shade, and looked fabulous. I didn't burn myself. I loved the fabric. The world was back as it should be. :-)
I also ended up painting the lamp bases. They were a shiny gold color, with some black in them. I painted the bases with a metallic craft paint called Rich Espresso. Which actually looks like a really deep bronze. Then I took a matte black spray paint and sprayed it very very lightly over the bronze, to darken the color up just a bit more. They came out perfect. The original finish is on the left, my madeover version is on the right. (Pre black spray paint)
And the funny thing was, once I finished everything an put them all together, along with the finials I had purchased at the same time as the shades, the new color matched the finish on the finials perfectly. I'm guessing there was some subconscious thought processes goin on there.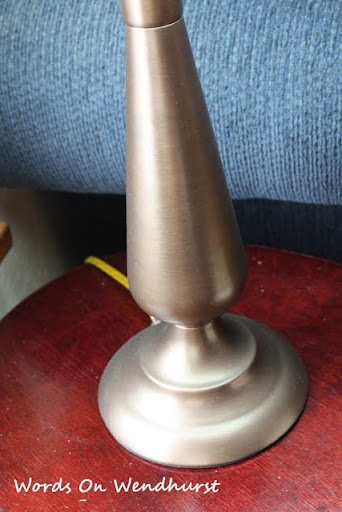
So, in the end, my total came to about $30 per lamp, after the initial purchase of the lamp and shades, the first fabric purchase, the second purchase, and the miscellaneous supplies. I 'm not sure I would have snatched a pair of lamps off the shelf for that price, but the end result is something I absolutely LOVE, I made entirely by myself, and they are so classic looking that I won't tire of them easily. So if I had known all of that in the store, I probably would have paid that.

What do YOU think? Was it worth all of the hard work and heartache?
Linked to Metamorphosis Monday @ Between Naps on The Porch
Make Your Monday @ Twice Remembered
Make it for Monday @ Cottage Instincts
DIY Day @ A Soft Place to Land
Get Your Craft On @ Today's Creative Blog
Thrifty Thursday @ Tales from Bloggeritaville
Transformation Thursdays @ The Shabby Chic Cottage
Strut Your Stuff Thursday @ Somewhat Simple
Before and After Party @ Thrifty Decor Chick
I Made it Without My Hubby @ Shanty 2 Chic


12 comments:
nice work!! I have a lamp that I've been wanting to show on my blog…but I need to re-do what I already re-did!! It was a freebie I picked up off the side of the road (my neighborhood in ROC was great for that!), and I love the linen I chose to recover it, but it looks goofy at the moment. too much fabric folded to the inside, so when i turn it on, it looks awful. And I tried pleating the top but didn't really have enough of a circumference difference from top to bottom, so only ended up with 4 teeny pleats that look really dumb. So I want to trim the excess off and get rid of the pleats so it's just smooth. Then maybe I'll post it!
It looks really great, Jenny. You get a standing "O" from me because I would have totally given up. Totally. I'm a slacker like that. But, I'm glad you stuck with it cause they look great! I love the color you chose for the base and I love the height of them in your living room.
Nicely done! They turned out great!
Rebekah @ allthingzrelated~ hosting a giveaway this Tuesday!
wow- I applaud your tenaciousness... I have been trying to muster up the courage to redo a couple of lampshades I have(for like 4 years now)! How did you trace the right size on the fabric? I am afraid to do it. I know what you mean about being "all in" I've spent close to 30.00 on fabric and trims.. I could have just bought the lamp AND the shades...sigh. Any hoo, I love how yours turned out-great job!
Thanks for all the lovely comments girls!
jen - I want to see this lamp you speak of. I also want to see pics of your most recent trip. Please don't make us wait a year! :-)
Kim - the crafting ADD definitely made it hard to finish this project. But, I was determined to not let it best me. :-)
Ann - I marked one of the "poles" of the lampshade with masking tape, and then slowly rolled out the frame over the fabric, tracing the outline onto the fabric as I went with chalk. I got the idea from Thrifty Decor Chick, here's a link to see how she did it.
http://thriftydecorchick.blogspot.com/2008/09/lampshade-tutorial.html
jen – I want to see this lamp you speak of. I also want to see pics of your most recent trip. Please don’t make us wait a year! :-)
Love your lamp remake. Isn't it fun to learn by trial and error! Haha! You did a great job!
Blessings, Grace
Love the lamps! Trial and error can create beauty with patience!
Wow! That was some project! The lamps and shades look great and I like their size.
Your lamp turned out great! I have a lampshade I need to do something with...I've never attempted one before. I think all your hard work was worth it, looking at something and knowing you did it yourself is so much more satisfying than just purchasing it!
Nice re-do!!
Thank you so much for linking up with the Talented Tuesday link party at My Frugal Family, which is hosted every Tuesday. Please feel free to stop back in every week and post your newest projects!
Your lamp looks so lovely! Thanks for sharing!
Post a Comment